Showing posts with label Character. Show all posts

Tuesday, December 20, 2016

Semester Reveiew

Progress Achieved

Rugger Approaches Completion


Who's This dashing Amphibian?

If you recall my earlier post about my semester project, you'll perhaps recognize the handsome gentleman pictured above. For the first time in a while, I have most nearly completed a project in the amount of time I predicted. (By most nearly I mean there is a scene I have not finished but soon It will be done and this post will be updated) When I get the finishing touches done after winter break, I will have the final product that I intend to submit to eMagine this spring!


I encountered many challenges while finishing this project, but not nearly as many as I encountered in my various 3D projects. Since, when I last left you off, I had created a movie file to help me time my frames, most of the work since then has been drawing the frames and organizing them into workable layers (no need to re-render a background when you can just have the characters move, similar to older 2D levels of animation).


Additionally, I had to make a few sacrifices to the intended product to make the animation more possible. For example, I no longer have Rugger gesture for his drink in the second scene, due to time restrictions. Also, the no longer has freckles on his shoulders, to eliminate possible headaches in the second scene as he pulls himself up on the counter. Shading, as well, has been scrapped so that I can get something view-able rendered in time. It's a bit more than I wanted to sacrifice, but I came into this project simply wanting to get something done, and I did that! I am quite proud of myself for getting this far, and no longer have to wonder if I'll have nothing to show for my years of eComm.


You ready? Take a look below to see for yourself what this final project looks like!


Tuesday, October 11, 2016

Senior Year First Project Hops Into Action!

Going For Gold!

One Frog, One Goal


For our senior year of high school, the scenario is very similar to that of junior year, but with greater expectations. Due to the time-consuming nature of 3D animation, this year, in order to get the the 'animating' part of animation faster, I am attempting a hand drawn animation.

The Frog

If you got past the groan-inducing pun you may have noticed in the title of this post, you may have inferred that the subject of my animation was a frog. This frog is not just any frog, however: this frog is a gun-slinging rough-and-tumble cowboy frog. Our unnamed hero is destined, in this particular animation, to enter a bar of unspecified nomenclature and order a questionably fresh glass of water. It's rather straightforward in nature, but will take considerable effort nonetheless, due to my lack of practice in the realm of 2D movement.

The natural first step to any animation is creating a storyboard. To the left is one of the first scenes from the storyboard I made for this animation, showing him entering the bar. On the right, a later one showing a pose he will take when ordering his drink. It's very important to plan out an animation as in-depth as possible to avoid having to redo parts later on in the process. It also helps plan out camera shots.

While there may not be an actual camera involved in 2D animation nowadays, it is still important to structure each scene dramatically for the greater communicated effect. Since I had not taken part in the video section of the program I am in, this has proven to be an oddly difficult thing for me to puzzle out. For example, the storyboard where he opens the door has a decent camera angle, but doesn't emphasize much about him. On the other hand:

This shot is similar, but uses the looming shadow to make him seem relatively diminutive compared to everybody else, inducing a sense of comedy at the beginning, despite a dramatic set up.
Timing is essential to comedy, so to time it out, I've taken a variety of key poses and put them together in after effects to get a feel for ho the animation will flow upon completion. Timing feels more objective than it should be, but I know that, with practice, I can become very aware of how to create a natural flow of events.


Below is one example of a times out scene. It is extremely rough, but it serves enough to give me a feel for where the frames will need to be.


My goal now is to finish all the rough scenes, then go over them with cleaner lines digitally and, if time allows, to add color to this. I find color just as important as timing in communicating mood, so optimally I will be able achieve a relatively nice-looking animation by the end of second quarter.

Wish me luck!

Thursday, May 12, 2016

Ampich-Anne: Character Modeling

Waiting, She's Waiting,

(Waiting for the frame to render...)


Meet Ampich-Anne: a friendly girl with a robot body! Well, not actually. The real concept is a bodiless alien that can inhabit machinery, but that is not too important right now! What is important is my attempt to create her! After dealing with Petri for so long, I wanted to use my rigging and modeling knowledge on something new!


I knew that rigging a mechanical character would be much easier than doing another organic model, so I wanted to keep the specs of my project smaller so I could be able to rig and model it within the rest of the mostly gone school year.


On the left I have one of my pictures of my character, but I knew I couldn't keep to it very well: The webbing would have been nearly impossible to do with my skill set and time, there were a lot of extraneous bits on the legs I knew I would leave behind, and the shoulder and thigh joints were to unrealistic. (With that arrangement she wouldn't be able to lift her arms up straight, and I had no idea how to manage the drawn hip setup) So, I went to work simplifying the design and making it smoother. Given that I drew her a little different each time, I didn't have many qualms changing the little indiscreet details for the sake of this model.


When I started, my major alterations were to the upper arms and thighs (I added a luminescent glass texture to them) and a small skirt-shaped piece that concealed the rough end of the segmented torso. I was very proud of how the body and face and hands came out, I took many, many, gratuitous screenshots of it. There was one GLARING problem, however (and no, it was not the eyes): the shoulders (again). You see, I didn't notice the problem I had mentioned earlier regarding the arm mobility until the point when I tried to move the arms. I ended up having to redo them completely and replaced the shoulder shown above with a more doughnut-shaped one.

At this point perhaps you may be wondering why I'm showing you all of this. Is it just a model? Am I going to animate it? Am I just showing off? The answer to all of these is "maybe, we'll see". but in all honesty, this project is a kind of final thesis for me, I think. It has taken all the small lessons I learned about Maya and combined them to make this (relatively) usable character. While I have not animated it, I certainly have posed it. I think My main goal with this character was honestly light practice and modeling (both in the creating and posing sense) practice. Below are a few examples of lighting (left) and posing (right) experimentation.


Coincidentally, I worked on this project around the same time that my teacher assigned us the topic of "time". Being in animation, it should be exceedingly easy to display time in a non-alarm-clock fashion. I, however, wanted to try to show time in a still image. I wanted to show her waiting. Not being in an organic body, She could feasibly wait in one area for extremely long periods of time. My idea was to take two identical images with differing textures and fuse them into each other as if they were a before and after statement.


Here is the result! I made it go from a more lush field to a sandy wasteland, signaling a deterioration of the climate, or maybe just a season change. I have her looking to the right as if she is looking towards the future, longing. If I were to fix it, I know I would increase the shadow resolution (to avoid that blocky-ness) and maybe make the grass and sand fade into each other more instead of just harshly dividing at Ampich-Anne. It contrasts a bit too much with the gradient sky.

But anyway, I thank anyone who has been sticking around and checking on my work over the last few years, heres my final, desired result of my shiny texture rendering. I hope you enjoy the intricate reactions as much as I do!


Tuesday, May 10, 2016

Petri Swallow: Revamped

The Bird Is Back

For the last time, however.


Remember Petri? That yellow bird that gave me so much grief last semester? Well, I revived him! (Mostly by popular demand of my peers, however.) I wanted to make something out of him to prove that I had not spent an entire semester working in vain. (Which it really did feel like I kind of did, in a way.) 

So, I buckled down and made my quasi-rigged bird move for the audience of expectant friends and parents. And, looking at it now, it wasn't as bad as anticipated. Surely not as good I wanted, but ok.

Here it is:


Now, I know it's short and the rigging is not smooth and he never does get his drink, but I think this particular animation is a testament to this past year of animation and my growth in dealing with some particularly horrid issues and incomprehensibly frustrating challenges along the way!

Tuesday, December 15, 2015

Petri Swallow: Large Project Turned Learning Experience

So what happens when you underestimate a project?

You learn. Fast.


Say hello to Pertri: a small bird with a big problem. We'll get to that problem later. For now, allow me to introduce you officially to the project I have been working on for the past semester. Now, what I expected Petri to become was is far removed from what he ended up being (not to mention that they went though several gender changes and arguments before I finally gave in to calling Petri a 'he' like everyone else did). Here is an overview of what I had expected at the start of the semester:


It started from a simple sketch, a small bird with a broom cleaning alligator's teeth like a dentist-janitor combo. I, having designed the bird to be more or less simple and round, chose Petri to be the star of my first semester animation project.

Little did I know how much work that would turn out to be.


The story went as so: 

Petri flies into work one day to attend to a large clint with a larger problem: there's one tooth that just won't get clean.

Petri tries and tries to clean it, using all sorts of unorthodox methods, but no matter what he does, nothing helps. In the end, in frustration, he ends up accidentally breaking the tooth, bringing about his untimely demise at the hands, er-mouth, of the gator.

I had a storyboard, but the pencil marks were to light and smudged to scan and show you.

So, to the real problem:

Oh wait, not that problem.


This problem:


(You can tell it's the real problem because I made it larger)

This is what happens when you don't construct your rig quite right
The name of this problem? Rigging. For those of you who don't know or are unfamiliar with rigging: rigging is the placement of bones in an animated character to make animation easier and to define character movement. In essence, constructing their skeleton, as you can see above. 

Now you may be thinking: "But Greta, that looks like a fine and dandy skillet rig you've got going there, what's the problem?" But my friend, I must tell you this is the finished, refined rig of the bird. While it doesn't look much different from the initial setup, it is far better at what is was built to do that version 1.0. 


To get to this stage of superior rigging, I went through modeling, rigging, assigning bones to joints, beginning animation, and then undoing all my work until I was back at square two: rigging. Because of this, I have no true finished "animation", but the amount I have learned from the project makes all the struggle and turmoil and headaches worth it. For example: The prop and scenery work shown below from what I had anticipated to be part of the final work.


The most valuable skill I gained from this is the proper, or at least more efficient, way to rig a character in Maya. IK rigging is a kind of rigging shortcut that takes where you want a certain joint to be, and moves all subsequent joints in a way that will get it there. It takes longer to set up, but makes the actual animating a whole world easier.

So, in summary, will I be putting forth more effort to get something done right next semester?

Yup. I want to be able to get something completed this time.

Will I grossly underestimate the scope of a project?

I hope not. I need to take careful consideration of what difficulties the next project will have.

Will I be using IK rigging the first time?

Oh yes. It's a very handy tool and I hope to perfect my work on it.

Will you all be seeing more of me and my work next year?

You bet! I want to be more active on this blog, so I may also post some non-animation art ventures to keep this place a tad more lively!

Remember, if you have anything to say leave it in the comments! I like to get feedback and hear what you all think!

Friday, October 9, 2015

Acting in Animation

Acting? What does that have to do with Animation?

More than you'd expect, it seems


Today I took a look at Doron A. Meir's article on acting and animation. While the title intrigued me, the content did more so. In his article, Meir covers what it really means to bring a character to life in animation. He doesn't just mean the story or even the design, but the movement of a character in itself, whether you were the one directing the story or just working off a given script, Meir stresses the importance of acting.

Meir claims that modern animations have come to lack the higher quality of acting in their animation as seen in older works. He sees the characters as well modeled, but poorly developed and poorly acted. He sees the character move, but he can no longer feel them working as an individual character. Meir's definition of acting requires that the animator can think, feel, react, and retain the consistency of the character in a way that makes the audience believe that the character is a real, living, breathing (where applicable), thinking individual: a practice that is much harder than you may think.

While Meir may have a good point, they provide little to no evidence to support their claims on neither the loss of acting nor any way to bring it back to the spotlight. Meir gives us no clear examples of a poorly acted and well-acted character in any more detail than a name. This, unfortunately, detracts from their interesting argument a little, giving us no more than some textbook terms on how to feel, react, and set the mood.

Despite the detraction from his validity, Meir does bring up an interesting point, whether or not this is becoming less prevalent: how to do more than make a character move. What Meir misses in the things he sees are the extra thoughts and effort to truly develop a character. Sometimes I can see what he means by it, too. I need to be sure to, with my own characters, bring to life their personalities and make them empathize-able on-screen to the viewers.


See the article yourself at:

http://www.animationarena.com/acting-and-animation.html


Tuesday, May 19, 2015

E.T. - Extra Technological

THE HOME STRETCH:

Robot Meets Life Meets Cumulative Final Project


Meet Robo: A rising star in the student movie clip industry. While he may not appear to be much, it was our task to give him his premier debut.

Well, maybe that wasn't exactly the outline of the project, but it's pretty close. Our real assignment was to apply all that we have learned into a group project. These new skills we aimed to apply were skills like 3D modeling, lighting, using a green screen, and special effects. My team: Jessica Love, Jessie Blom, and myself. With our combined powers, we got down to business.


To start off, we dove into the essence of the plot: the storyboard. Since storyboarding is something I particularly like to do, I took charge and scribbled our cheesy ideas down. (Now, I know my art can be better than this, but we didn't want to spend so much time on this) We came up with the idea of parodying that one scene from E.T., but with a robot on another planet. Robots: what could possibly go wrong? (Maya, that's what, but more about that later)

We went though a few hardcore rounds of 'nose-goes' and Jessica came out as our actor. So, while my comrades trekked down to the green screen studio, I stayed behind as our resident "Maya Master". For those unfamiliar, Autodesk Maya is a  3D modeling program, and the one we happened to have in the classroom. It's not a bad program, but it does have it's quirks. Some of those quirks, I've found, can be rather, or more accurately, extremely frustrating. But we'll get to that story.


Looks OK now, but...
I had an absolute blast modeling our resident star in Maya. Being a robot, he was easily composed of inorganic shapes which are much easier to make in maya than say, a hand. The special touch I added this time was parenting. 

Parenting, beyond the maternal and paternal varieties, is the act of taking one shape, and sticking it to another shape. This means that, if I move the parent shape, all child shapes below it will move, but not any shapes that the parent is parented. it's like a big tree, branches of children extending from the one, mighty parent at the bottom. If that shape moves, all the rest follow. This was crucial to having our robot move since who would want a robot whose elbow didn't move with it's shoulder? or its torso? No one, that's who. I put my heart and soul into perfecting our co-star.


Look at this absolute mess

The final trial on the modeling before animation was the wrists. (You can see they don't move in the final product) 

This was a rather blunt showcase of one of maya's specialties: Screwing up the simple stuff. I mean, just look at what it did to poor Pasted_cylinder_RWrist. 

Complete disaster. 

But, nevertheless, I persevered and came out with our amazing robot: Robo. A few shiny textures later and we were on the fast track.


ROBO in his completed glory


On the flip side of our team, we'd gathered our green screen shots together to key them out. By 'key out', I mean remove that bright green color from the background and replace with with something cool.

After compiling our efforts, we added the nifty sounds of Celldweller's The Wings of Icarus and Viola, we had our project. (It's a cool track, I'd listen to the whole thing if the clip interests you, it's interesting music for sure)


This project, overall, has taught me some of the more in depth abilities of Maya. I learned how to apply my knowledge of shapes, Booleans, parenting, and even aligning to make the robot reach it's highest degree of excellence. Outside of my new-found technical prowess, We, as a team, also gained more experience in team synergy and division of labor. (This is something I need more practice in for sure)

For future projects, I feel that I'd like to keep with the group dynamic we had for this one, but with more communication. I felt it may have been smart to check each other more often so that we are all and the same track. I also feel that, as we all improve in our chosen tracks, that we'll find even more smooth and easy teamwork styles to use. I await being able to work with the people I have seen in the future. And without further ado: our project:


Tuesday, April 21, 2015

e-MAGINE the Festivities

Greetings readers!


That's me on the left there. My friend Katelyn is on the right.

As you may or may not be aware, my high school Olathe northwest, hosts an annual digital media festival so gallantly named e-MAGINE.

Schools all across the Kansas-Missouri area converge on my home turf to display their digital proficiencies in animation, graphics design, video, and web design! With categories spreading from advertisements to 3D organic modeling, there was a place for everyone to show off their skills! To see what I mean, you can check out all of the entries here.

My Personal Entry:


Of course, there's no way that I wouldn't have submitted something to this event (especially given that I was required to attend regardless of participation), and I took a week of my like to animate one of the most bizarre character designs I have in my arsenal: Jeffely. (Whom you can search to see more of at my Deviant Art)

Now, Jeffely may not make any sense physically, but I can assure you that he's a full-fledged character with a fleshed-out personality (even if you can't see it from this simple loop animation) and I adore drawing him doing all sorts of things.

This perfect loop may have been seamless and well put together, but I only got into the top 5, and did not formally place, for I had not given the image any of his personality or story. But since I had not tried for any, I was not surprised. (At least I got on the slideshow this year)

Here's My Entry:


NEXT YEAR I plan to enter something amazing, something that contains sweat, blood, and passion poured into it over an extended time. I will strive to make a STORY. (And maybe even beat McCall)

So anticipate the best when it comes time to enter again! Wish me luck!

Monday, November 24, 2014

How Plumtrr's Escape Came Together

It's Story Time:

And today we're going to see how much can go into a single story


(The original story is actually quite complex: involving arranged marriages
and daring escapes, but this is the summary version)
What is a story without a good character? Not much, I'd say. Meet Plumtrr: an avian alien on the run. He's a character I made a year ago, (And one of many, at that), and he will be the star of the short animation I'm exited to share with you today! Shortly, we will be able to see him make his escape! The Idea for this was to create a short, multi-scene animation with a basic plot, and I feel I navigated those parameters easily.


Now, The story may be the meat of any animation short, but there is a lot that goes into setting up that  storyline meat and cooking it in a presentation-ready fashion. For this story, I dived into AfterEffects once again. Now, I am steadily getting more and more comfortable with the tools provided to me in after effects, and adjusting to the timing of walk cycles and similar things, so this was destined to be a huge step up from my last animation posted here.

I started where I perform best: on standard paper. I used up many sheets to get all the necessary bits and pieces for my animation (Line wise) in order. To the right, we se only one of the total 3-4 sheets I used in this stage of the development.

I had to be careful, while drawing, to leave anything I wanted to move separate from it's related parts. On the picture to the right, you can see how disjointed everything looks: the Bridge is apart from the ship, and Plumtrr's limbs are all over the place. There were even parts I didm' end up using later, but it's better to be safe than sorry, I'd think.

The next step was to scan the images in and drop them into Photoshop for some color.


In Photoshop, I used multiply layers to give color (And some texture) to the various aspects of each scanned image. I didn't do much shading, for a lack of time, but that would be something I would do in the future. And perhaps I'd have to make several copies of shaded images for different light sources. But for now, I didn't focus on that so much.

After each part was colored and separated out in Photoshop (With the use of the quick select and magic wand), they were ready to be plopped right into AfterEffects to be set up.

In AfterEffects, I began by setting the central point for each layer and putting the isolated pieces together like they should be. I parented most layers: The head to the body, the eyes to the head, and so on. The before and after images can be seen below:

Maybe We CAN put Humpty back together again. We just need AfterEffects! 


Look how cute and pixel-y he can be!

Now that we had all the pictures and images together and colored, it was time to put them into action. How did I do that? With compositions! Now, for those of you unfamiliar with the concept of compositions, think of them like those little Russian nesting dolls. If you make an image, like Plumtrr here, into a composition on it's own and make him walk, you can place that walking character composition as a layer in any other composition you want! You can even resize it as you please.

The two pictures to the right are images of the same composition in two different settings, set to two different sizes. If I edited the composition to dance, then in every scene containing that composition, he would dance rather than walk. (Which would be funny, but not quite what I was going for).

Using compositions, I was able to save time by not having to reanimate the walk cycle every time I needed him to go somewhere. This also works for backgrounds or environment objects, where it can be much easier to animate on their own, as not to be confused working on them in a more crowded and busy scene.

Now, I also used compositions to separate out individual scenes. For each separate scene I put together in a composition, I could edit how much of that scene or what order I wanted them in on the fly! It was very convenient and I will be happy to organize projects like this in the future.

But, to be more detailed, there was a lot more to it then just sticking everything in a composition and saying "That's good". This project tested my timing abilities and planning skills. If I didn't plan out the timing of a scene before hand, then one mistake meant I had to backtrack a lot to fix that mistake, which was never fun.

For example: the scene with the ships navigating the rocks took much longer then any other scene, because without a defined coordination to the ships, I was constantly redoing each collision to adjust.
And even when I did get a good deal of the timing down, I still feel that I needed more of a reaction when the ships hit the rocks. Everything moves a tad too smoothly and there needed to be more a jerk to each stop.

That scene had, by far, the most keyframes than any other, as seen on the left. it was the busiest scene in the short, and took the longest to produce in after effects.

(But even after all that, I regret nothing involving the attempt)


The last tool I revisited was the puppet pin tool, for a minor movement towards the middle. The puppet pin took is a good tool for living movements, but I had to use the opposing starch tool to hold the head in place.

With all these different tools set up to put my pieces into motion, I finished by placing the scenes together in a single composition, and exported it.

I and happy with the result, but I aspire to do better each time I attempt an animation. Soon I plan to incorporate shading and other physics aspects into my work.


Friday, September 12, 2014

Character Walk Cycle

My Character:

For our first character animation in this class, I drew a bird-cyborg character I've been drawing and working on for at least a year now. His name is Hahn, and he has some robot parts to replace parts of himself he lost in an attack on his town. The bird face is mostly for aesthetics, to be honest. And I felt that being able to animate Hahn would be very cool, since I've been doodling him for so long.

My Original Character Sketch:


We had to draw them in pieces so it'd be easier to animate!

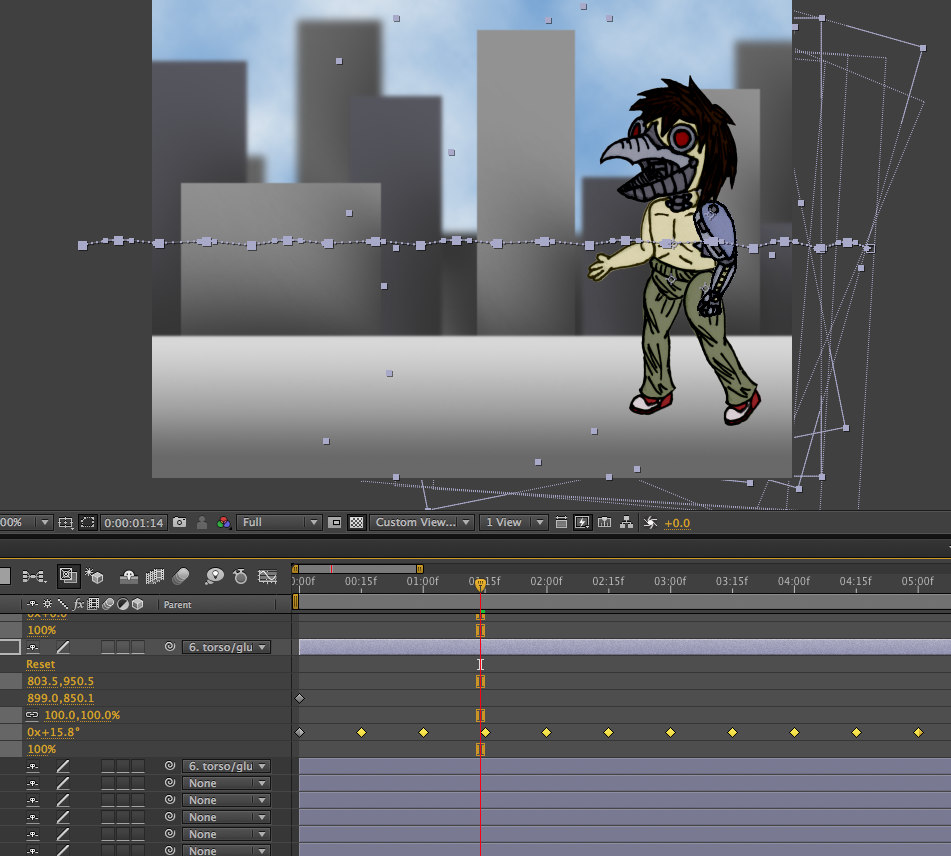
When we got them into after effects (After coloring and refining them), the walk cycle took a while to piece together. It was a matter of timing the most ion of the torso so that the feet would seem to stay in place while he propelled himself forward.
First, I gave each leg a repeating cycle of forward and backwards, alternating with each other: that was the easy part. Then, I experimented with moving the torso forward in time with the feet, and gave him some up and down motion on each step to make it look more natural than simply moving forward. After I got past that part, I gave the arms some motion a little off timing to the legs, to give him more of a real feel, and less of a shape moving across a plane feel.

A Snapshot of my Timeline:


(The legs mostly used rotation for movement, rather than physical motion)

When it comes to my finished product, I learned a lot from it. I discovered that using the transparency grid as a reference point for movement help you keep something consistent in motion. I also discovered a good method for converting drawings in photoshop into easily manipulatable pieces in Aftereffects, like a paper doll you can assign the joints and regulate motion. the third thing I can pull form this assignment is what makes a walk cycle convincing. The trick, I have discovered, is to keep one foot on the ground at all times, and keeping it in the same spot. If you do this, the illusion of propelling themselves with that one foot while it stays there becomes much more real.
That last tidbit in itself was the hardest part of the whole process to nail down.

If I were to redo it, I would probably go in and give him some more give, like a bit of squash and stretch when he steps and such, as he goes by. And maybe give him some shading or a shadow so he isn't as flat.

Beyond that, however, I am in love with this animation, and I cannot get over how cool it feels to bring a character to life, and for the first time, see them DOING things! And I can only get better and better at it! I look to the future eagerly, and now I'm sure it would be the coolest thing to get After Effects at home so I can do things like this on my own in my free time!

My Finished Animation:

(I suggest viewing it at full screen for the quality at small size leaves much to be desired)